Turning Your ESP32-CAM into a Smart Object Detector with Edge Impulse
- melpomenisoula
- Feb 6, 2024
- 3 min read
Hello, tech enthusiasts, welcome to the AI Journal tutorial! In this blog post, we're diving into the exciting world of creating your own object detection model on the ESP32-CAM using Edge Impulse.
Specifically, we will walk through the process of collecting data with both a smartphone and the ESP32-CAM, labeling images, creating a powerful model, and deploying it to your ESP32-CAM board.
Prerequisites: Before we embark on this creative journey, make sure you've got the following at your fingertips:
An Edge Impulse Account (No worries, it comes with a hassle-free 14-day free trial, no credit card required)
Your trusty smartphone
An ESP32-CAM with ESP32-CAM-MB
The Arduino IDE, downloaded and ready to roll
Step 1: Let's Get Started!
Create a new project in Edge Impulse and give it a name that resonates your project.

Step 2: Snapping Shots with Your Smartphone
Head over to the Data Acquisition section, connect your smartphone using the provided barcode, and hit "Get started."

Your phone is now synced with Edge Impulse, ready to capture images of your objects.
Press "Collecting Images" on your smartphone and label them; for example, if you're photographing a cup, simply name it "Cup." Aim for at least 75 images per object, capturing them from various angles for a robust dataset.


Repeat the process for the second object (e.g., mousepad), ensuring to update the label accordingly.
Collect a total of 150 images (75 for each object, with 80 for training and 20 for testing).
Step 3: Labeling
Move on to the Labelling Queue, where you'll add bounding boxes to your images. Follow the easy instructions to create labels that go beyond just names, providing spatial context to your model.


Repeat the labeling process for all images.
Step 4: Create your Impulse
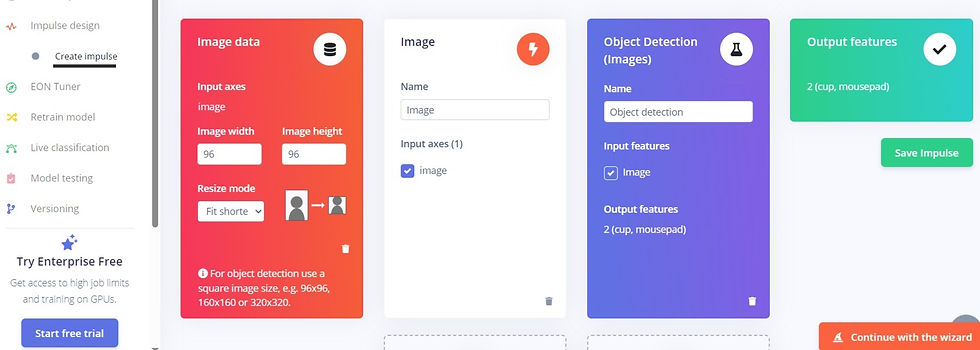
Click on "Create Impulse" and add processing blocks for image processing and object detection, as below:

Save your creation, and in the Image section, set the Color Depth to Grayscale.

Step 5: Unleash the Features
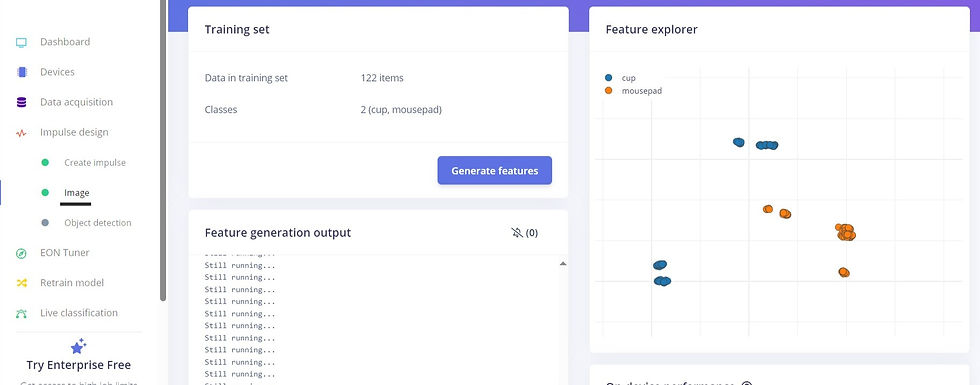
Then you will go to subsection Image. Click the "Generate Features" button and let Edge Impulse analyze and extract features from your vibrant dataset. This step might take a few minutes, so grab a coffee and enjoy the anticipation.

Step 6: Neural Network Magic
Object Detection time! Opt for the "FOMO (Faster Objects, More Objects) MobileNetV2 0.1" model for the neural network.
Click "Start Training" and watch the magic unfold.
The training process might take a bit, but the stats keep you company.
Review the Confusion Matrix to assess the model's success.

Step 7: Liberate Your Model
Now, head to the Deployment menu, select Arduino Library, and click Build.
Download the ZIP file – this will integrate the model with the Arduino IDE.
Step 8: Arduino IDE
Open the Arduino IDE, install the Edge Impulse library, and load the sample code.


Adjust the camera model definition to match your ESP32-CAM variant.
Upload the sketch to your ESP32-CAM, and you're ready to roll.

Step 9: Testing, Testing!
With your model uploaded, it's showtime!
Test it using the objects you trained it on, and witness the results on the Serial Monitor. Confidence levels, bounding box coordinates, and sizes – it's all there.

Step 10: ESP32-CAM Takes the Stage Again
This step is a game-changer! Let's dive into the crucial, oh-so-important "ESP32-CAM Encore" where we take our model to the next level by infusing it with additional data collected directly from our ESP32-CAM.
For this, install Edge Impulse CLI tools following the provided instructions by Edge Impulse (Installation - Edge Impulse Documentation)
Create an Edge Impulse account if you haven't already.
Install Python 3 on your computer.
Install Node.js v16 or above.
For Windows users, ensure you install the Additional Node.js tools during installation.
Open your terminal or command prompt and install the Edge Impulse CLI with the command: npm install -g edge-impulse-cli --force
Let's Get Back to Edge Impulse:
Open Edge Impulse and either create a new project or enhance your existing project with more ESP32-CAM data.
Download the provided firmware and flash it onto your ESP32-CAM.
Open a command prompt and type: edge-impulse-daemon --clean.
Follow the prompts to input your email, Edge Impulse account code, and name your device.

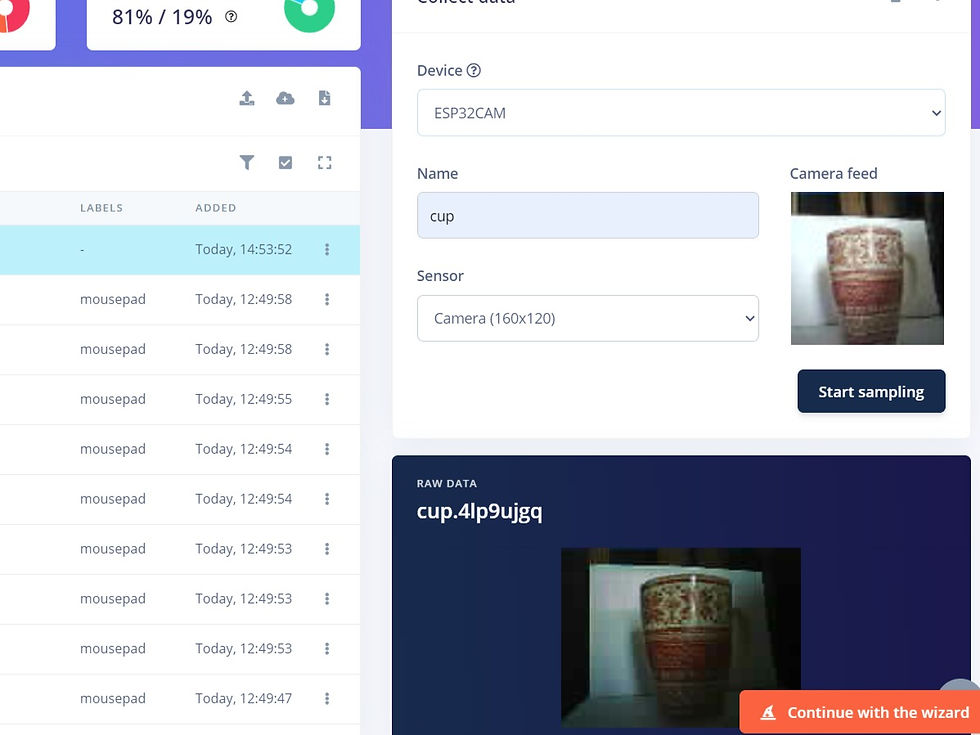
Your ESP32-CAM is now connected to your Edge Impulse project, ready to capture data. Time to hit the field!

Follow the same data collection procedure as before. Let it capture images and contribute to the richness of your dataset.
Congratulations, you've transformed your ESP32-CAM into a smart object detector!
This tutorial has walked you through every step, from data collection with your smartphone to leveraging the power of the ESP32-CAM for even more dynamic results. Get creative, experiment, and enjoy the journey of making your ESP32-CAM an intelligent device in your tech arsenal.
Happy coding!
Melina and Cynthia


Comments